This guide provides detailed instructions for installing and configuring Proxmox on the NanoPC-T6. It covers each phase, from downloading the operating system to server installation and configuration, to be followed step by step. Additionally, it will explain how to change the boot partition for NVMe booting.
¶ Prerequisites
Before you begin, ensure that you have the following:
- A NanoPC T6 with at least 8GB of RAM.
- An SD Card of at least 16GB.
- A USB-A to USB-C Cable for the flashing.
For NVMe disk boot, you need to install the custom Rockchip boot image on SPINOR, SD Card, or eMMC.
¶ Requisites
- For this tutorial we will use Armbian such as OS, you can download the system by click here.
- For edit the uboot system boot priority you need to download RKDevTool, you can download all necessary files by click here.
- For install Armbian you've to flash the SD Card, so you've to download BalenaEtcher by clicking here.
- All steps are currently available if you're using Windows.
¶ 1. Flashing Steps
Now, it's time to review all the steps involved in installing and configuring the board, including setting boot partition priorities and other relevant configurations.
¶ 1.1 Edit the boot priority partition
It's crucial to remember that for flashing SPINOR, you must press the mask button during startup.
Additionally, ensure that you've connected the PC to the board using the USB-C connection.
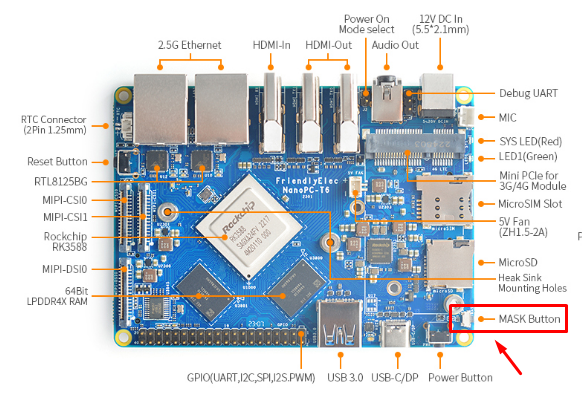
¶ 1.2 Identify the mask button
¶ 1.3 Flashing with the RKDevTool
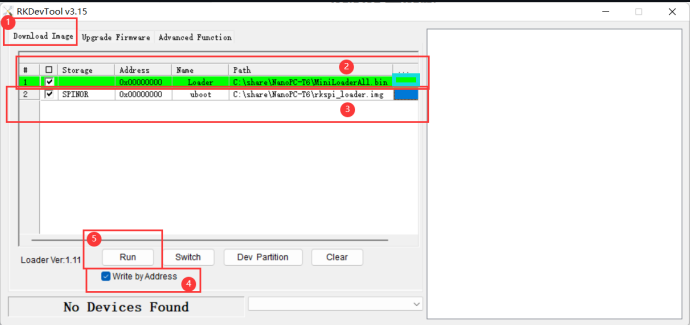
| Step | Action | Instructions |
|---|---|---|
| 2 | Choose loader bin file | (1) Click blue area, choose loader.bin(2) Address: 0x00000000(3) Storage: blank |
| 3 | Choose UBOOT file | (1) Click blue area, choose rkspi_loader.img(2) Address: 0x00000000(3) Storage: SPINOR |
| 5 | Run | Download loader.bin, then write rkspi_loader.img into SPINOR |
¶ 1.4 Boot order
The new boot order is now represented as follows:
| Order | Storage | Description |
|---|---|---|
| 1 | SD Card | Secure Digital card |
| 2 | EMMC | Embedded Multi-Media Card |
| 3 | NvME | Non-Volatile Memory Express |
Remember not to have any operating system installed on both the SD Card and the eMMC. You can always use them for data storage purposes, as having the operating system on either of these units will prevent the system from booting directly from the NvME drive.
¶ 1.5 Flash the SD Card
Before moving forward, let's flash Armbian onto the SD Card using BalenaEtcher. Follow these steps:
- Open BalenaEtcher.
- Choose the Armbian image you downloaded earlier.
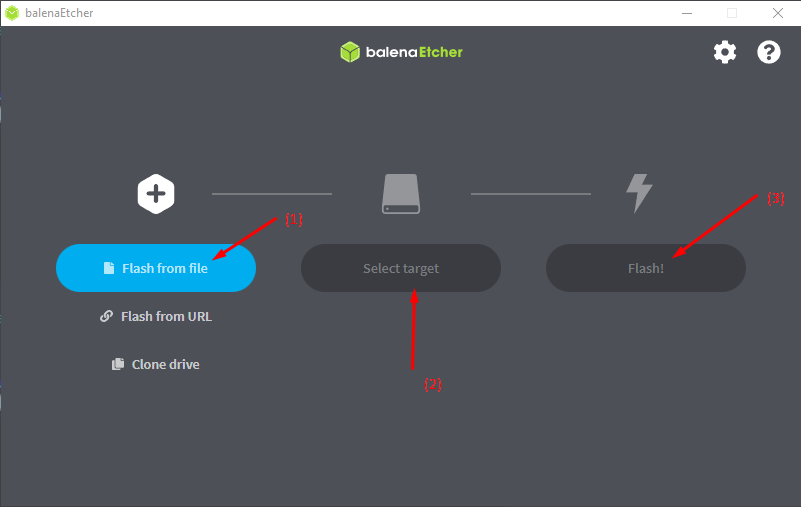
After flashing, remember to disconnect the SD Card from your PC and insert it into the NanoPC T6.
Here are the default login credentials:
| Username | Password |
|---|---|
| root | 1234 |
¶ 1.6 Flashing NvME Drive from NanoPC
Now that you're inside your NanoPC, you need to download the operating system directly onto the NanoPC. You can either download it from the internet or use SFTP to transfer the previously downloaded file. Remember, once you've loaded the operating system onto the NvME drive, you'll need to reset the previously changed password.
To proceed with loading the image, follow these commands:
xz -dc Armbian_community_24.5.0-trunk.433_Nanopct6_bookworm_edge_6.8.7_minimal.img.xz | dd of=/dev/nvme0n1 bs=4k status=progress && sync
Once it's finished, execute the command shutdown -h now, wait for the LED to stop flashing, and then proceed with removing the SD Card.
¶ 2. Installation of Proxmox
To install Proxmox, you need to configure a static IP. It's advisable to install only the "standard" package selection, as Proxmox VE includes its own packages for qemu and lxc. A desktop environment is unnecessary.
Let's do it!
¶ 2.1 Configure Hostname and IP
- Add an entry in
/etc/hostsfor your IP address, ensuring your machine's hostname is resolvable. - Remove the default entry
127.0.1.1. - Example
/etc/hostsconfiguration:127.0.0.1 localhost.localdomain localhost 192.168.15.77 prox4m1.proxmox.com prox4m1 # IPv6 lines (optional) ::1 localhost ip6-localhost ip6-loopback ff02::1 ip6-allnodes ff02::2 ip6-allrouters - Verify setup with
hostname --ip-address, which should return your IP address.
¶ 2.2 Install Proxmox VE
- Add the Proxmox VE repository:
echo 'deb [arch=arm64] https://mirrors.apqa.cn/proxmox/debian/pve bookworm port' > /etc/apt/sources.list.d/pveport.list - Add the repository key:
curl -L https://mirrors.apqa.cn/proxmox/debian/pveport.gpg -o /etc/apt/trusted.gpg.d/pveport.gpg - Update repositories and system:
apt update && apt full-upgrade - Install Proxmox VE packages and dependencies:
apt install ifupdown2 proxmox-ve postfix open-iscsi - Configure packages during installation according to your preferences, especially postfix for email routing.
- If unsure, choose local only for postfix configuration.
- Access the admin web interface at
https://youripaddress:8006after installation.
If you encounter an error for ifupdown2, run the following command:
systemctl enable --now networking.service, then retryapt install ifupdown2, and you should no longer receive the error.
Done, you've installed Proxmox on Your NanoPC T6, below i attach all useful link for following the status of development of this porting.